Showing posts with label ANDROID. Show all posts
Showing posts with label ANDROID. Show all posts
Saturday, 14 March 2015
0
Saturday, 14 March 2015
PRABH KARAN SINGH

Android 5.0 Lollipop brings a range of changes to Google's OS. Available initially on the Nexus 9 and Nexus 6, but now rolling out to a wider collection of devices, there's plenty of new features to get to grips with.
If you're feeling a little lost, or don't know where to find something, our Android 5.0 tips and tricks will get you started. We've even broken it down into sections to make it easier to find what you're looking for.
Have fun exploring and be sure to let us know any hot tips of your own in the comments below. We will be adding to this list as we see more Android 5.0 Lollipop devices - but bear in mind that manufacturers like HTC and Samsung will change how Lollipop behaves on their devices.
Tap to wake: Don't reach for the power button, just double tap the display and it will wake up, so long as your device has the hardware to support it.
Search settings: Rather than rooting through everything, you can search the settings. Just open up the Settings menu and hit the magnifying glass and type what you're looking for.
Stop adding new app icons to homescreen: If you don't want new apps you install cluttering up your homescreen, head into Play Store > Settings and uncheck the box.
Add Yahoo! Mail to Gmail: You can add Yahoo! or other mail services to Gmail. Tap the icon to open the sidebar, scroll all the way to the bottom and hit Settings > Add account. You have the option for Google, IMAP/POP3 services (like Yahoo, Outlook.com) and Exchange.
Attach anything to Gmail: It's not new, but tap the attachment button and you can attach local files, things in Drive, Photos, Dropbox files, OneDrive box and so on. It's really flexible.
Limit Drive-enabled apps to Wi-Fi sync only: To save yourself a data bill, head into the Google Settings app > Drive-enabled apps and turn on Wi-Fi only. Alternatively, if you need it to sync on a cellular connection, switch it off!
Customise Google Now: Tap the settings icon that appears in the search bar. Here you can select the content you want to see, as well as change the settings, or place reminders.
Set a metered Wi-Fi network: Head into Settings > Data usage and select Network restrictions from the menu. Here you can set a Wi-Fi as metered, so it will restrict background data and give warnings for large downloads, perfect for tethering or Mi-Fi hotspots.
Turn off backgrounds in Calendar: Don't like the seasonal backdrop in your new calendar? Head into Settings and tap the slider to turn it off.
Turn on 5.1 surround sound: Play Movies now supports 5.1 soundtracks. Head into Settings > Enable Surround Sound. There's even a demo clip so you can test it.
Pinch to expand: Got a stack of notifications? You can pinch to expand them, both on the lockscreen and in the notifications area.
Hide sensitive information in lock screen notifications: You can have lockscreen notifications without to much information being revealed. Head to Settings > Sound & notification > App notifications, to manage apps with sensitive information.
Then go to Settings > Sound & notification > When device is locked, to change the information revealed. This will then ensure that all apps you've marked up don't give anything away.
To mark an app as a Priority app: Head into Settings > Sound & notification > App notifications and you can set and app as a priority so you always get notifications from that app.
To turn off notifications on an app: Go to Settings > Sound & notification > App notifications. Here you can block all notifications for any app on your device.
Silence notifications: Hit the volume button and then hit None, Priority or All. If you select Priority, only your Priority notifications will be served up.
Suspend notifications: Hit the volume button, select None, then either Indefinitely, or select a time period - ideal to keep your device silent during meetings. You can also opt here to only have Priority notifications for a time period, before reverting back to all notifications.
Quickly switch to vibrate alerts: If you want silence, but are after vibration alerts still, then push the volume button and tap the bell on the pop-up. This will switch to vibrate.
Quickly manage Bluetooth: The same applies to Bluetooth. Click beneath the Bluetooth icon in Quick Settings and you'll head into settings to select your device.
Turn on flashlight: There's no need for a separate app, just tap the button in Quick Settings to turn on your flash as a torch.
Cast your screen: Want your Android device on your TV? Just swipe down and tap Cast screen and it will be sent to your Chromecast. Not all apps are supported though.
Time till fully charged: Charge time is displayed when connected to a charger. Look at the bottom of the lock screen and in the battery status screen, but it takes a little while for Android to calculate how long charging will take.
See what's eating battery: Swipe down Quick Settings, tap the battery icon. You'll go to the battery status page and see how long you have left and what apps are eating your battery.
Turn on power saver: In the battery status page, tap the menu button, select power saver. You can elect to have to automatically switch on at 15 per cent or 5 per cent battery. The system bars turn orange when it is on.
Guest profile: In the same area (Settings > Users) you can create a Guest profile. While it is setup, you'll get the option to access as a guest from the lock screen.
See how much storage they're using: If you want to know how much space is being used up by another profile, head into Settings > Storage. At the bottom of the list it says how much other profile and the guest is using.
Face unlock: Head to Settings > Security > Smart Lock. Here you can have the device register your face, so it will unlock when you look at it. This is in addition to a pattern or password. If it fails to recognise your face, you'll have to enter your password.
Bluetooth unlock: Again in Security > Smart Lock, you have the option to nominate trusted devices, so your Android will unlock when connected to something else. You can nominate Bluetooth devices (like your smartwatch or car Bluetooth) or select an NFC tag.
ALSO LIKE ON FACEBOOK PAGE FOR DAILY UPDATE https://www.facebook.com/hackingandtips
Read more...
Android 5.0 Lollipop tips and tricks: Get to grips with a new Android
Android 5.0 Lollipop brings a range of changes to Google's OS. Available initially on the Nexus 9 and Nexus 6, but now rolling out to a wider collection of devices, there's plenty of new features to get to grips with.
If you're feeling a little lost, or don't know where to find something, our Android 5.0 tips and tricks will get you started. We've even broken it down into sections to make it easier to find what you're looking for.
Have fun exploring and be sure to let us know any hot tips of your own in the comments below. We will be adding to this list as we see more Android 5.0 Lollipop devices - but bear in mind that manufacturers like HTC and Samsung will change how Lollipop behaves on their devices.
Android 5.0 general tips and tricks
Play Flappy Android: Lollipop's Easter Egg is an Android take on Flappy Bird. Head into Settings > About phone/tablet > Android version. Then tap the Android version repeatedly until it changes to the Lollipop screen. Once you have the full Lollipop wording visible, press and hold. You'll flip into the Flappy Android game. Enjoy!Tap to wake: Don't reach for the power button, just double tap the display and it will wake up, so long as your device has the hardware to support it.
Search settings: Rather than rooting through everything, you can search the settings. Just open up the Settings menu and hit the magnifying glass and type what you're looking for.
Stop adding new app icons to homescreen: If you don't want new apps you install cluttering up your homescreen, head into Play Store > Settings and uncheck the box.
Add Yahoo! Mail to Gmail: You can add Yahoo! or other mail services to Gmail. Tap the icon to open the sidebar, scroll all the way to the bottom and hit Settings > Add account. You have the option for Google, IMAP/POP3 services (like Yahoo, Outlook.com) and Exchange.
Attach anything to Gmail: It's not new, but tap the attachment button and you can attach local files, things in Drive, Photos, Dropbox files, OneDrive box and so on. It's really flexible.
Limit Drive-enabled apps to Wi-Fi sync only: To save yourself a data bill, head into the Google Settings app > Drive-enabled apps and turn on Wi-Fi only. Alternatively, if you need it to sync on a cellular connection, switch it off!
Customise Google Now: Tap the settings icon that appears in the search bar. Here you can select the content you want to see, as well as change the settings, or place reminders.
Set a metered Wi-Fi network: Head into Settings > Data usage and select Network restrictions from the menu. Here you can set a Wi-Fi as metered, so it will restrict background data and give warnings for large downloads, perfect for tethering or Mi-Fi hotspots.
Turn off backgrounds in Calendar: Don't like the seasonal backdrop in your new calendar? Head into Settings and tap the slider to turn it off.
Turn on 5.1 surround sound: Play Movies now supports 5.1 soundtracks. Head into Settings > Enable Surround Sound. There's even a demo clip so you can test it.
Android 5.0 notifications tips and tricks
Instant access to lock screen notifications: Just tap a notification twice and it will open up the app. Want to dismiss it? Just swipe it away.Pinch to expand: Got a stack of notifications? You can pinch to expand them, both on the lockscreen and in the notifications area.
Hide sensitive information in lock screen notifications: You can have lockscreen notifications without to much information being revealed. Head to Settings > Sound & notification > App notifications, to manage apps with sensitive information.
Then go to Settings > Sound & notification > When device is locked, to change the information revealed. This will then ensure that all apps you've marked up don't give anything away.
To mark an app as a Priority app: Head into Settings > Sound & notification > App notifications and you can set and app as a priority so you always get notifications from that app.
To turn off notifications on an app: Go to Settings > Sound & notification > App notifications. Here you can block all notifications for any app on your device.
Silence notifications: Hit the volume button and then hit None, Priority or All. If you select Priority, only your Priority notifications will be served up.
Suspend notifications: Hit the volume button, select None, then either Indefinitely, or select a time period - ideal to keep your device silent during meetings. You can also opt here to only have Priority notifications for a time period, before reverting back to all notifications.
Quickly switch to vibrate alerts: If you want silence, but are after vibration alerts still, then push the volume button and tap the bell on the pop-up. This will switch to vibrate.
Quick Settings tips
Quickly select a WI-Fi network: Swipe down for Quick Settings, then click the network name beneath the WI-Fi icon. This takes you through to the WI-Fi settings.Quickly manage Bluetooth: The same applies to Bluetooth. Click beneath the Bluetooth icon in Quick Settings and you'll head into settings to select your device.
Turn on flashlight: There's no need for a separate app, just tap the button in Quick Settings to turn on your flash as a torch.
Cast your screen: Want your Android device on your TV? Just swipe down and tap Cast screen and it will be sent to your Chromecast. Not all apps are supported though.
Android 5.0 battery tips and tricks
See your battery percentage: Open Quick Settings with a two-finger swipe. Your battery percentage is displayed here.Time till fully charged: Charge time is displayed when connected to a charger. Look at the bottom of the lock screen and in the battery status screen, but it takes a little while for Android to calculate how long charging will take.
See what's eating battery: Swipe down Quick Settings, tap the battery icon. You'll go to the battery status page and see how long you have left and what apps are eating your battery.
Turn on power saver: In the battery status page, tap the menu button, select power saver. You can elect to have to automatically switch on at 15 per cent or 5 per cent battery. The system bars turn orange when it is on.
Multiple user tips
Limit what users can see: Create a restricted profile by tapping Settings > Users > Restricted profile. You can then limit what your children can access, for example.Guest profile: In the same area (Settings > Users) you can create a Guest profile. While it is setup, you'll get the option to access as a guest from the lock screen.
See how much storage they're using: If you want to know how much space is being used up by another profile, head into Settings > Storage. At the bottom of the list it says how much other profile and the guest is using.
Security
Instant lock: In Settings > Security there's the option to lock the device as soon as the screen goes to sleep. You'll find the option to lock as soon as you press the power button too. These are old settings, but really useful.Face unlock: Head to Settings > Security > Smart Lock. Here you can have the device register your face, so it will unlock when you look at it. This is in addition to a pattern or password. If it fails to recognise your face, you'll have to enter your password.
Bluetooth unlock: Again in Security > Smart Lock, you have the option to nominate trusted devices, so your Android will unlock when connected to something else. You can nominate Bluetooth devices (like your smartwatch or car Bluetooth) or select an NFC tag.
ALSO LIKE ON FACEBOOK PAGE FOR DAILY UPDATE https://www.facebook.com/hackingandtips
Thursday, 6 March 2014
0
Thursday, 6 March 2014
PRABH KARAN SINGH
Read more...
Best Android Hacking Tips and Tricks
Android Hacking Tips and Tricks
 Android is the Linux based operating system designed primarily for touch
screen mobile phones. Now a days android phones are so much popular
that they covered almost 65% of total mobile phones market.They are rich
in functionality as well as user friendly. Many android users don’t
know much about the hidden features of android phones. Today we are
sharing an article which will tell you the best secret android tricks
and hidden features of android phones. Different versions of android
versions support different set of android tricks, so try all the
following android tricks. I am not sure which will going to work on your
handset.
Android is the Linux based operating system designed primarily for touch
screen mobile phones. Now a days android phones are so much popular
that they covered almost 65% of total mobile phones market.They are rich
in functionality as well as user friendly. Many android users don’t
know much about the hidden features of android phones. Today we are
sharing an article which will tell you the best secret android tricks
and hidden features of android phones. Different versions of android
versions support different set of android tricks, so try all the
following android tricks. I am not sure which will going to work on your
handset.
1) Force reboot:
Many times android users face a problem of freezing of mobile phone, In case your android phone is frozen, you can reboot it using an android trick.
Just press Power Button+ Home Key + Volume up button simultaneously.
2) Quick Google Access:
Android phones built primarily for internet, many of android users don’t know that android phones provide a way by which we can access Google search in just a single click. To use this android trick,
Press menu key and hold it for couple of seconds, it will launch the Google search.
3) Reboot Android in safe mode:
As like computers, we can also reboot android phones in safe mode. The latest android jelly bean version provides an option to reboot in safe mode, if something goes wrong.
To reboot your android in safe mode, follow the below given instructions.
*Long press the power button
*Long press on the power off option.
Android phone will show a confirmation message about rebooting it in safe mode, if we reboot android phone in safe mode then all the 3rd party application will be disabled. These applications can again be enabled when we reboot our phone normally. This is a great android utility in case when, one of your 3rd party application is causing trouble for you and you want to hunt it.
4) Unlock android phones by face detection:
This is a cool android trick by which you can unlock your phone by using face detection, In the jelly bean version, android provides a way by which android phone can be unlock using face detection, to make this feature more secure, jelly bean version added another layer of protection in which android phone can be unlocked only when the face is matched as well as we have to blink eyes in order to unlock phone. Blinking eyes tells the android security system that person is live and it’s not an illegal attempt of unlocking using a still image.
To activate this,
Go to Settings > Security > Screen lock > Face unlock.
5) Get detailed information about phone status:
We can get the detailed statistics like phone information, battery information, usage statistics and WiFi information by just dialing *#*#4636#*#*
This is a handy USSD to get the details about battery usage, DNS check, Ping, Application time usage time and so on.
6) Move android apps to SD card:
Its good idea to install android apps in SD card, but what if you installed apps on your phone memory. Don’t worry android phones provide a way by which we can move our apps to SD card. To move apps to SD card, follow these steps:
Go to settings > Application settings > Manage application > Select the application, You will see the option “Move to SD card”.
7) Hard Reset and Factory reset your android phone:
This android trick comes handy at the time of selling an android phone. Android phone can be formatted in two ways
Factory reset
Hard reset
a) Factory reset: In factory reset, your phone is being formatted to factory level. Means all the settings will go by default and all the internal data will be deleted. To factory reset a phone dial *#*#7780#*#*.
b) Hard reset: To hard reset a phone dial *2767*3855#, this will delete all the data (including internal and External SD data) as well as settings of android phone. Don’t try this code for testing purpose, until you are not sure. It will not ask for a confirmation.
8) Context menu in android:
long press on the screen, will show you additional options for customizing android phones. This context menu is somewhat similar to the right click menu of most operating systems.
9) Taking screen shots on android phone:
Android phones offer a great feature by which we can take the screen shot without using any 3rd party application. However the screen shot android tricks vary from one android version to another version.
Press the Home button + power button (This trick work on most android phones.)
For Galaxy Nexus: Power button + volume down button.
For Galaxy Note 2 and S3: Swipe your palm on the screen to take screen shot.
10) Android Version Animation:
This is another cool android trick to play with your android phone.
To use this android trick, Go to settings > about phone > Tab repeatedly on ‘Android version’.
After sometime, the android version will be animated.
1) Force reboot:
Many times android users face a problem of freezing of mobile phone, In case your android phone is frozen, you can reboot it using an android trick.
Just press Power Button+ Home Key + Volume up button simultaneously.
2) Quick Google Access:
Android phones built primarily for internet, many of android users don’t know that android phones provide a way by which we can access Google search in just a single click. To use this android trick,
Press menu key and hold it for couple of seconds, it will launch the Google search.
3) Reboot Android in safe mode:
As like computers, we can also reboot android phones in safe mode. The latest android jelly bean version provides an option to reboot in safe mode, if something goes wrong.
To reboot your android in safe mode, follow the below given instructions.
*Long press the power button
*Long press on the power off option.
Android phone will show a confirmation message about rebooting it in safe mode, if we reboot android phone in safe mode then all the 3rd party application will be disabled. These applications can again be enabled when we reboot our phone normally. This is a great android utility in case when, one of your 3rd party application is causing trouble for you and you want to hunt it.
4) Unlock android phones by face detection:
This is a cool android trick by which you can unlock your phone by using face detection, In the jelly bean version, android provides a way by which android phone can be unlock using face detection, to make this feature more secure, jelly bean version added another layer of protection in which android phone can be unlocked only when the face is matched as well as we have to blink eyes in order to unlock phone. Blinking eyes tells the android security system that person is live and it’s not an illegal attempt of unlocking using a still image.
To activate this,
Go to Settings > Security > Screen lock > Face unlock.
5) Get detailed information about phone status:
We can get the detailed statistics like phone information, battery information, usage statistics and WiFi information by just dialing *#*#4636#*#*
This is a handy USSD to get the details about battery usage, DNS check, Ping, Application time usage time and so on.
6) Move android apps to SD card:
Its good idea to install android apps in SD card, but what if you installed apps on your phone memory. Don’t worry android phones provide a way by which we can move our apps to SD card. To move apps to SD card, follow these steps:
Go to settings > Application settings > Manage application > Select the application, You will see the option “Move to SD card”.
7) Hard Reset and Factory reset your android phone:
This android trick comes handy at the time of selling an android phone. Android phone can be formatted in two ways
Factory reset
Hard reset
a) Factory reset: In factory reset, your phone is being formatted to factory level. Means all the settings will go by default and all the internal data will be deleted. To factory reset a phone dial *#*#7780#*#*.
b) Hard reset: To hard reset a phone dial *2767*3855#, this will delete all the data (including internal and External SD data) as well as settings of android phone. Don’t try this code for testing purpose, until you are not sure. It will not ask for a confirmation.
8) Context menu in android:
long press on the screen, will show you additional options for customizing android phones. This context menu is somewhat similar to the right click menu of most operating systems.
9) Taking screen shots on android phone:
Android phones offer a great feature by which we can take the screen shot without using any 3rd party application. However the screen shot android tricks vary from one android version to another version.
Press the Home button + power button (This trick work on most android phones.)
For Galaxy Nexus: Power button + volume down button.
For Galaxy Note 2 and S3: Swipe your palm on the screen to take screen shot.
10) Android Version Animation:
This is another cool android trick to play with your android phone.
To use this android trick, Go to settings > about phone > Tab repeatedly on ‘Android version’.
After sometime, the android version will be animated.
Wednesday, 5 March 2014
0
Wednesday, 5 March 2014
PRABH KARAN SINGH


Read more...
Themer – the Best android Application to Customize your Smartphone
Themer – the Best android Application to Customize your Smartphone
When you get the new android device the first thing you would like to do
is customize its look to speedup your work flow and make it look more
awesome!
There are many applications are available in the Google Play Store which
helps you to customize the look and feel of your Android Smartphone.
There are many launchers are available in the Google Play Store like
Nova Launcher, Solo Launcher and many more. But the thing is once you
have installed the one launcher then you have to use the same theme i
mean you can customize it but you can’t customize the theme well.
Themer Is an Awesome android application which will give the cool look to your android Smartphone.
You can get the Themer from here and you can install the Themer in to your android device.
Themer is a set of the themes there are many themes available and you
can find it after the installing the Themer android application.
As you can see in the bellow snapshot you can find the trading themes
for the android device and you can easily apply the same theme by just
tapping apply button :) and then the theme will start downloading and it
will be applied within 2 minuets.
Before browsing and applying theme you have to set “Themer” as your
default launcher and then your grid view of the application will also
get awesome appearance like this.
You can also categorize the application so if you have installed many
applications then it will make it easy for you to navigate your
applications.
There are lots of themes are available in the Themer android
application, i personally recommend to use this launcher to change the
look of your android Smartphone and amaze your friends!
If you have any questions then feel free to ask! :) stay connected with hackingandtips.blogspot.in for more awesome android tips,
android application development and much more things about the android.
Thursday, 21 November 2013
0
Thursday, 21 November 2013
PRABH KARAN SINGH
How to Bypass Android Pattern Lock
With advantage of
locking screen using this unique way , there is also a problem that
sometimes many of android users have to face i.e. what if they forget
the pattern they had used to lock their device or try to unlock it with
wrong pattern number of times that turned device to get locked
permanently ?
If you stuck in such problem so dont worry there are three methods to unlock your device.

First method includes a simple way of logging in to your Google account and then getting RID of that lock pattern.This is easiest and most recommended way of unlocking your device.So if you have entered wrong pattern for 5 times and then if it is showing you the Forgot Lock Pattern option, then you can login through your Google account and bypass the lock pattern system on your device.

Read more...
How to Bypass Android Pattern Lock
How to Bypass Android Pattern Lock


Android introduces a cool new feature to ensure protection of private data to it's users by Pattern Lock technique. It is a unique thinking , other than remembering or setting difficult combination of password characters whether in numeric or alphabetic form. Pattern lock provides a huge set of patterns to choose from. User may set any unique and different pattern according to their wish anytime.
With advantage of
locking screen using this unique way , there is also a problem that
sometimes many of android users have to face i.e. what if they forget
the pattern they had used to lock their device or try to unlock it with
wrong pattern number of times that turned device to get locked
permanently ?
If you stuck in such problem so dont worry there are three methods to unlock your device.
Method 1. Unlock Lock Pattern Using Your Email
First method includes a simple way of logging in to your Google account and then getting RID of that lock pattern.This is easiest and most recommended way of unlocking your device.So if you have entered wrong pattern for 5 times and then if it is showing you the Forgot Lock Pattern option, then you can login through your Google account and bypass the lock pattern system on your device.
Method 2. Unlock Lock Pattern Using Command Prompt
If you have forgotten your email too and unable to log in to your google
account then the second method could be handy that includes executing
few lines of script in command prompt which will allow you to write any
pattern and to get into your OS . As this method includes use of command
lines , so it is not that user friendly but it is the most effective
way for sure. It involves a few steps :
Step 1: Connect your Android Phone to Your Computer.
Step 2 : Open command prompt as administrator.
Step 3 : Now in command prompt window type the following code carefully exactly as it is and then press enter.
adb shell
cd /data/data/com.android.providers.settings/databases
sqlite3 settings.db
update system set value=0 where name='lock_pattern_autolock';
update system set value=0 where name='lockscreen.lockedoutpermanently';
.quit
cd /data/data/com.android.providers.settings/databases
sqlite3 settings.db
update system set value=0 where name='lock_pattern_autolock';
update system set value=0 where name='lockscreen.lockedoutpermanently';
.quit
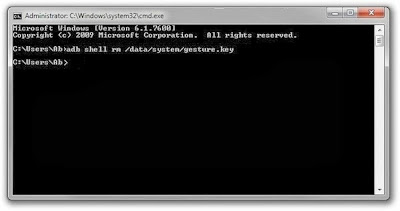
Step 4 : Now you will some screen as shown below and then you can reboot your phone and
now when your will start again then try unlocking your phone using any
random lock pattern and it will work pretty fine.
Step 5 : If you face any problem repeat same steps but instead of the above code try using
adb shell rm /data/system/gesture.key and then press enter and now try rebooting your device to see if it works.Method 3. Unlock Using Hard Reset Option
Hard Reset is an inbuilt feature of android phones and tablets and every
device has it. This method will unlock your device but will remove all
user's data and settings as well. You should use this method when none
of the above methods work for you and you need to unlock your device
urgently. This will remove only the data from phone memory and not from
the SD card available in phone.
It involves a few steps to unlock device :
Step 1 : Switch off your phone.
Step 2 : Now while turning your phone on , you need to press some
specific combination of keys. Generally it is volume up + power button
in many of the android devices so try them first and if they dont work
for you so here are list of some popular device combination keys or else
better way is to google it.
- Nexus 7 - Volume Up + Volume Down + Power
- Samsung Galaxy S3 - Volume Up + Home + Power
- Motorola Droid X - Home + Power
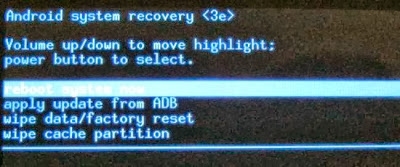
you will see some screen like shown above. Just navigate to wipe data/factory
reset using volume keys and then press Power button to select it.
Step 4 : You will see a screen as shown below :
Step 5 : After you reach to Yes option , select it by using power
switch and then it will erase all data on your phone and will unlock it
and so ready to be used once again .
So these were possibly all methods for unlocking Android device and to
Bypass the pattern lock of android device but if you know any other
methods so please do comment below and I will add your method too .
ALSO LIKE ON FACEBOOK PAGE FOR DAILY UPDATES https://www.facebook.com/hackingandtips
Monday, 14 October 2013
0
Monday, 14 October 2013
PRABH KARAN SINGH
Google along with the Chromecast and the new Nexus 7 also announced the new Android 4.3 which looks same as 4.3 and you would not notice the any major difference, but their are some minor changes which would speed up your Nexus Devices. So let’s start…….

The changes which would take place in Android 4.3 are :
Read more...
Android 4.3 Announced by Google and How to install it using Factory Images.
Android 4.3 Announced by Google and How to install it using Factory Images.
Google along with the Chromecast and the new Nexus 7 also announced the new Android 4.3 which looks same as 4.3 and you would not notice the any major difference, but their are some minor changes which would speed up your Nexus Devices. So let’s start…….
The changes which would take place in Android 4.3 are :
- Multi-Users with some Restrictions (It means now you could restrict some apps for some users)
- Bluetooth LE (Bluetooth Low Energy which would save your device’s battery)
- OpenGL ES 3.0 (Improves Graphics)
- DRM API’s (For full 1080p video streaming.
- DialPad Auto-complete (It means now if you tap on a number, a lot of suggestion with the matching number appears)
- Location Improvements (The gyroscope and magnetometer can now report raw and ostensibly more accurate data to games and apps)
- Security Improvements (The /system partition is now mounted to prevent apps from executing setuid programs (closing some vulnerabilities) and Android now uses the SELinux mandatory access control system.)
- More Languages Support Added (Africans, Amharic, Hindi, Swahili, and Zulu. Now, Android 4.3 includes better support for right-to-left text in Hebrew, Aramaic, and other languages, enabling it in more portions of the default Android user interface. The launcher, clock, Quick Settings toggles, dialer, People app, setup wizard, Downloads app, and more now support RTL displays.)
- Logging (Now Data from brought from hardware, modules, kernel functions. t’s with a built-in indicator for drawing, issuing, and waiting on commands, with the green bar indicating a 60ms threshold for the frames per second goal.)
- Disabled Tabs in Apps ( A Disabled tab is added for seeing the apps you disabled.)
- Download Android SDK from here : http://developer.android.com/sdk/index.html
- Install the Fastboot and ADB drivers from here :
- Make Sure you are having Galaxy Nexus / Nexus 4 / Nexus 10 / Nexus 7
- Download the Suitable Factory Image for you Phone / Tablet : https://developers.google.com/android/nexus/images
- Once downloaded, extract the .tzg into into the “ C:\android-sdk-windows\platform-tools “. For e.g. extract “ yakju-jwr66v-factory-ad817ccc.tar” . After extraction you will see a file with no extension, rename it and put ” .zip ” at the end of the extracted file.
- Now open that file to get bootloader , radio and image files for flashing.
- Then , Right click on the “ android-sdk-windows ” and select ” Open CMD Window here “
- Then, Make sure the device is connected to the computer while in fastboot mode.
- Galaxy Nexus – Vol Up + Vol Down + Power
- Nexus 7 – Vol Up + Vol Down + Power
- Nexus 4 – Vol Down + Power
- Nexus 10 – Vol Up + Vol Down + Power
- Then after going into fastboot mode, connect your phone / tablet, Computer will recognize your phone / tablet and will install some drivers.
- After Step 8, In CMD, Type ” fastboot devices “. This should return a device ID if it’s recognized. If nothing is returned, it means your device is not connected in fastboot mode, or the drivers aren’t installed/configured correctly.
- Then if it recognize, type ” fastboot oem unlock “. It would unlock the bootloader and wipe all your data.
- After that, type the following commands in the following order (Make sure to type in correct order) :
-
” fastboot erase boot “
-
” fastboot erase cache “
-
” fastboot erase recovery “
-
” fastboot erase system “
-
” fastboot erase userdata “
-
- Then after all steps are done, type ” fastboot flash bootloader “name of the bootloader” ” . Then type “ fastboot reboot-bootloader “
- Then after all steps are done, type ” fastboot flash radio “name of the radio” “. Then type “ fastboot reboot-bootloader “
- Last step, type ” fastboot -w update ” name of the zip file ” ”
- The device now has been flash to Android 4.3
Tuesday, 16 July 2013
0
Tuesday, 16 July 2013
PRABH KARAN SINGH
Read more...
MediaTek to launch a 2GHz Octa Core processor – The MT6592
MediaTek is formerly known for its low-cost, low-performance SoC’s
used in low cost android smartphones. Before the announcement of this
processor, people especially tech savvy people don’t consider MediaTek
processor’s for daily use. Most chinese smartphone manufacturers like
Micromax, Karbonn, XOLO etc. use MediaTek processors to power their
smartphones.

This processor is said to start shipping in the July and smartphones powered with this processor should be out by December 2013 or so.
Octa Core Processor Now coming on to the MT6592
The Octa Core processor is supposed to be clocked at 2GHz and rumor states it that is has a score of 30,000+ on Antutu and out-performs the Samsung’s octa-core Exynos 5410 in benchmarks. The amazing thing about this SoC is that it has 8 cores of Cortex A7 (Yes, 8 cores in a single SoC) made using 28nm manufacturing process rather than the Exynos 5 Octa used in the Samsung Galaxy S4 which has 2 Quad Core processors which function according to the battery requirements. So, 8 cores don’t function at once thus you don’t get the “Octa-Core” performance.This processor is said to start shipping in the July and smartphones powered with this processor should be out by December 2013 or so.
ALSO LIKE ON FACEBOOK PAGE FOR DAILY UPDATES
Friday, 12 July 2013
0
Friday, 12 July 2013
PRABH KARAN SINGH
Read more...
Remove Priyanka Virus Spreading Through WhatsApp
Remove Priyanka Virus Spreading Through WhatsApp
In this post Today I am going to tell you how to remove the Priyanka Virus that is spreading through WhatsApp nowadays!
WhatsApp is a multi platform messaging app that is used my millions of people around the world.
WhatsApp lets you connect with your friends or other people no matter which platform they are using. Be it Android, iOS, Windows Phone, Blackberry OS or Symbian you can connect with your friends using this single app.
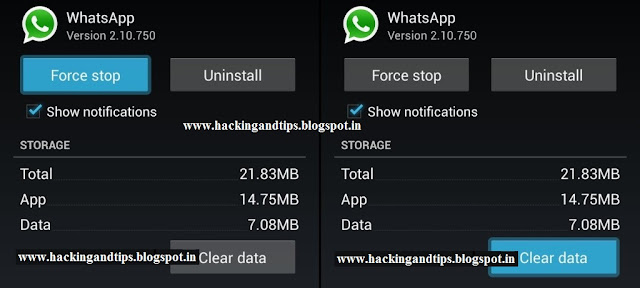
Just in this week a virus named “Priyanka” started infecting WhatsApp users. This virus started spreading itself using a contact file, users once save/add this to their contacts may have following consequences :
In this post Today I am going to tell you how to remove the Priyanka Virus that is spreading through WhatsApp nowadays!
WhatsApp is a multi platform messaging app that is used my millions of people around the world.
WhatsApp lets you connect with your friends or other people no matter which platform they are using. Be it Android, iOS, Windows Phone, Blackberry OS or Symbian you can connect with your friends using this single app.
Just in this week a virus named “Priyanka” started infecting WhatsApp users. This virus started spreading itself using a contact file, users once save/add this to their contacts may have following consequences :
- It would change names of all the group to “Priyanka”.
- Further on more infection it could replace all your contact names with “Priyanka”.
Friday, 10 May 2013
1
Friday, 10 May 2013
PRABH KARAN SINGH
Android is an awesome OS which gained recognition at rapid rate, it’s obvious for hackers to now target Android users. Now with loads of hackers targeting Android users, it’s time to get geared up with – What to download, and what not to.
Sources say that number of android devices infected with malwares have tripled since 2011. It’s time to take action!
There was a malware, which was found to be spread in 32 apps in Playstore. All the infected apps and accounts were suspended for investigation purposes, well that was a good and pretty fast step. According to Google, it has been downloaded by millions of users and has infected them, the ones who know about the malware might have uninstalled or taken precautionary measures later; but there are many users which don’t know anything about a malware being spread! It belongs to malware family named ‘Bad News’.
The malware works somehow works like this :-
It shows you advertisements, which when tapped, might give the ability to download and install applications, steal personal information such as your phone number etc.
Some of the apps which were infected previously can be seen in the photograph below -

PRECAUTIONARY MEASURE – Un-check ‘Unknown sources option in settings for preventing apps to install infected apps. It is also recommended to download a mobile security app/ a good antivirus from playstore, even a trial version would work!
Read more...
Android Malware detected in Google Play Apps
Android Malware detected in Google Play Apps
Hackers have always tried to find weak points and spaces to exploit users. They were pretty successful with windows, while Viruses for OSX came up a bit slowly.Android is an awesome OS which gained recognition at rapid rate, it’s obvious for hackers to now target Android users. Now with loads of hackers targeting Android users, it’s time to get geared up with – What to download, and what not to.
Sources say that number of android devices infected with malwares have tripled since 2011. It’s time to take action!
There was a malware, which was found to be spread in 32 apps in Playstore. All the infected apps and accounts were suspended for investigation purposes, well that was a good and pretty fast step. According to Google, it has been downloaded by millions of users and has infected them, the ones who know about the malware might have uninstalled or taken precautionary measures later; but there are many users which don’t know anything about a malware being spread! It belongs to malware family named ‘Bad News’.
The malware works somehow works like this :-
It shows you advertisements, which when tapped, might give the ability to download and install applications, steal personal information such as your phone number etc.
Some of the apps which were infected previously can be seen in the photograph below -
PRECAUTIONARY MEASURE – Un-check ‘Unknown sources option in settings for preventing apps to install infected apps. It is also recommended to download a mobile security app/ a good antivirus from playstore, even a trial version would work!
Sunday, 21 April 2013
0
Sunday, 21 April 2013
PRABH KARAN SINGH
What is Rooting ?

Rooting in Simple process which allows the android users to attain privileged control ( within Android System ) on their android smartphones , tablets and other android devices. Rooting , in most of the cases is done so that the particular user can overcome the limitations that a carrier puts on their branded device, for e.g. Verizon’s all devices comes with a pre-locked bootloader and it can be removed by rooting the phone and then unlocking the phone’s bootloader .
Rooting can also be used to install some apps (which are not compatible with the specific phone) , replace system files , change boot animations , boot sound , etc. With the Help of rooting , one can install a customized / newer version of Android and can remove the old android system through custom recovery (after rooting only). As you all might be knowing that android is based on Linux-Kernel and rooting is same as achieving some administrative rights on a Linux System , for e.g. , Ubuntu.
Rooting can also be used for advanced and dangerous functions such as overclocking , removing system files , modifying system files , removing carrier bloatware like my t-mobile , my hotspot , my verizon , etc. Rooting also installs an app , known as Superuser (It is an application which supervises also the applications which require the root access and can be used to grant rooting rights.) A secondary operation, unlocking the device’s Bootloader verification, is required to remove or replace the installed operating system.
 Rooting
an Android phone allows one to modify or delete the system files which
in turn can allow them to perform various tweaks, and use apps which
require root access.
Rooting
an Android phone allows one to modify or delete the system files which
in turn can allow them to perform various tweaks, and use apps which
require root access.
What is a Simple Process of Rooting ?
Now we will talk on what is a process of rooting an android phone. Rooting every Android Phone has its own different ways but one thing common in all the Android Phone is that to exploit a security bug which is installed in all Android Devices. Then , a complicated process of copying the su Binary to the /system/xbin/su PATH is done and results in granting the chmod executable commands.
Merits and Demerits of rooting an Android Phone :
Now , we will talk about Merits and Demerits of rooting an android phone.
Merits :
Demerits :
Read more...
What is Rooting and is it Good or Bad for Android?
What is Rooting and is it Good or Bad for Android?
Today we are going to talk about what is Rooting and is it Good or Bad for Android. So let’s Start..What is Rooting ?
Rooting in Simple process which allows the android users to attain privileged control ( within Android System ) on their android smartphones , tablets and other android devices. Rooting , in most of the cases is done so that the particular user can overcome the limitations that a carrier puts on their branded device, for e.g. Verizon’s all devices comes with a pre-locked bootloader and it can be removed by rooting the phone and then unlocking the phone’s bootloader .
Rooting can also be used to install some apps (which are not compatible with the specific phone) , replace system files , change boot animations , boot sound , etc. With the Help of rooting , one can install a customized / newer version of Android and can remove the old android system through custom recovery (after rooting only). As you all might be knowing that android is based on Linux-Kernel and rooting is same as achieving some administrative rights on a Linux System , for e.g. , Ubuntu.
Rooting can also be used for advanced and dangerous functions such as overclocking , removing system files , modifying system files , removing carrier bloatware like my t-mobile , my hotspot , my verizon , etc. Rooting also installs an app , known as Superuser (It is an application which supervises also the applications which require the root access and can be used to grant rooting rights.) A secondary operation, unlocking the device’s Bootloader verification, is required to remove or replace the installed operating system.
What is a Simple Process of Rooting ?
Now we will talk on what is a process of rooting an android phone. Rooting every Android Phone has its own different ways but one thing common in all the Android Phone is that to exploit a security bug which is installed in all Android Devices. Then , a complicated process of copying the su Binary to the /system/xbin/su PATH is done and results in granting the chmod executable commands.
Merits and Demerits of rooting an Android Phone :
Now , we will talk about Merits and Demerits of rooting an android phone.
Merits :
- Custom Rom – With the Help of rooting , we can download an install a custom rom which has much more features as compared to the stock android rom. With the Help of Custom Roms , we can perform many more functions , install latest version of android , etc.
- Overclocking – With the Help of rooting , we can overclock our device. Overclock means to increase the processing speed and clock rate of the device. With Overclocking , we can also make our phone much faster.But Overclocking can also result in sudden heating of device which can stop the device.
- Backup your device – Backing up your device means to backup all the data and apps. This Feature is missing in Stock Unrooted version of Android. But with rooting , we can use an app such as Titanium Backup for backing up our full android device.
- Upgrades Baseband - (it controls radio, improve signal & quality of your smartphone)
- You use custom kernels that can improve performance and increase battery backup
- Unlock additional features like WiFi and USB tethering
- You can flash custom android themes on your device.
- You can flash CWM easily that helps you to flash custom Rom.
- You can increase ram of your android device by using application like swapper.
- Increase In-Built Memory.

Demerits :
- It Void the Warranty
- Your Phone can be bricked . Brick means that your phone’s android rom / image will sort of destroy it thus your phone will not open and it can only go into Download Mode and Custom Recovery. ( However if you have A ROM in custom recovery , you can install a ROM )
- Security, viruses can enter through many rooted android apps.
- Source Code, android is open source and anyone can see the source code after rooting and it can be used for malicious purposes
- There is also the fear of overclocking or underclocking your processor during this process. This may cause the device to overheat and explode even in some extreme cases.
- Your Rom can get unstable and crashing problem will occur.
- You cannot update to official update automatically whenever it will release.
ALSO LIKE ON FACEBOOK PAGE TO FOR UPDATES
Subscribe to:
Posts
(
Atom
)