Tuesday, 19 November 2013
0


ALSO LIKE ON FACEBOOK PAGE FOR DAILY UPDATES
How to Uninstall Internet Explorer 11 for Windows 7
How to Uninstall Internet Explorer 11 for Windows 7
If you're having trouble with the uninstall of Internet Explorer 11 from your Windows 7 computer, you should continue reading this article, which contains instructions for downgrading the newest Internet Explorer software. And, we'd better review its system requirements for a Windows 7 system: Windows 7 32-bit/64-bit with Service Pack 1 (SP1) or higher, thus, to successfully and completely uninstall the Internet Explorer 11, we may need to uninstall all the updates installed too. Also, keep in mind that IE 11 has been installed as an update for your system.
Follow The following steps.
STEP 1:- Save and close all Internet Explorer windows and then, run Windows Task Manager to end the running processes in background.
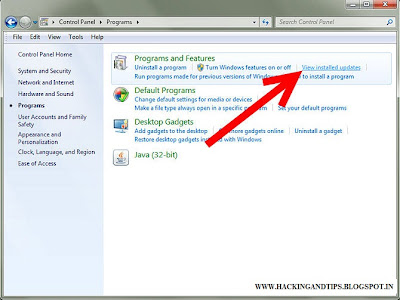
STEP 2:- Press Windows 7 Start orb button and go to Control Panel.

STEP 3:-Click Programs and choose the View installed updates instead.
 |
STEP 4:- Locate the following Windows Internet Explorer 11 or you can type "Internet Explorer" for a quick search. Then, you can directly press the Enter key on your keyboard.

STEP 5:- Choose the Yes option from the following "Uninstall an update".
STEP 6:- Please wait while Windows Internet Explorer 11 is being configured automatically.

STEP 7:- Follow the Microsoft Windows wizard to restart your system. Afterwards, you go back to the aforesaid View installed updates list, you remove all other newly installed Windows updates.

ALSO LIKE ON FACEBOOK PAGE FOR DAILY UPDATES
Subscribe to:
Post Comments
(
Atom
)
0 Responses to “ How to Uninstall Internet Explorer 11 for Windows 7 ”
Post a Comment